Sunday, July 01, 2012

Garden Faucet

The other week, I managed to replace the water valve in the back of our house that had been leaking for years. Turns out I was going about it all wrong at first.

The original water valve, minus its handle.
As you can see from the picture above, it looks like I should be able to unscrew the water valve from the L joint right at the top of the pipe. However, years of corrosion meant that valve wasn't going anywhere. Best I could do was get the handle off.

I asked for some advice on Facebook, and got a ton of responses: use a different wrench, put a pipe over the wrench to get more leverage, use penetrating oil, heat the valve, hit the valve with a hammer, etc.

The leverage suggestion made the most sense, but the problem with that is that I was bending the pipe, even with the relatively small wrench I had on hand. Adding more leverage would just cause me to bend it more. I decided to start with the penetrating oil. Unfortunately, that didn't work at all, and I ended up using too much force and bending the pipe significantly. I hadn't broken it yet, but I was close. No more force.

While considering the heat option, I realized that maybe I should stop messing around with the valve, and concentrate on the L joint below it. There was another project where I had to replace the valve to this same pipe on the inside of the house (never got around to writing that one up - sorry). My friend Jim actually did most of the soldering on that job, but I still had all the tools in the basement, so I brought them up.

Ready to solder. The trowel went unused.
After a lot of heat and some vice grips, the L joint lifted straight off the pipe.

Slightly bent, but unbroken.

This thing was about 5 billion degrees fahrenheit at the time this photo was taken.
Once the pipe cooled, I prepped it for the new L joint by sanding the top of it and adding flux. I did the same to the L joint itself. Then I fit them together and started heating the joint with the torch. After about 2 minutes, I touched the solder to the joint and it pretty much did all the work itself - it ran around the joint on its own. I added a little extra to the back where I couldn't see just to be sure, and then let it cool again. It all seemed to easy, and I was pretty sure it was going to leak.

Note the option to attach it to the wall with the screws. Definitely going to take advantage of that this time.

Finally, I added some teflon tape to the valve and screwed it into place. I went down to the basement, turned the water on, came back up, and would you believe it - no leaks. I think I lucked out.

Works like a charm.

Sunday, June 24, 2012

Still Here

Whoops, that was quite a cliffhanger, wasn't it? Day 1 of a multi-room renovation, and then silence for a year and a half. Did they blow up the house? Thankfully, no, although we still won't be inviting them back. They were here for a little over a week, and they did an acceptable job with the plastering and painting. Certainly better than we could have done in that span of time. However, there was literally no cleanup. There were half-hearted attempts at dust containment at the start of the week, but those quickly fell by the wayside. During the time they were here, it snowed, so slush and dirt was tracked through the house, mixing with the plaster dust that was everywhere. It took Betsy and me three solid days of scrubbing floors and wiping down every surface in the house to get it cleaned up. But that was long ago, and we're over it. All that's left to remind us are the water damage spots on the hardwood floors from whatever industrial-strength steamers they were using. Bastards.

 Here are some pics from the middle of that week:


Friday, January 14, 2011

Day 1 - Wallpaper Removal


EMH-110110_003, originally uploaded by E*M*H.

Lost of sticky, smelly glue. Kind of looks like a house from The Wire right now...

Friday, January 07, 2011

Here Come the Professionals

Time for the pros. The electrician came this week to install a light out by the front steps and to remove the chandelier from the dining room. He also moved the the electrical box for the light fixture so that it was centered over the table and replaced the knob and tube wiring with romex cable. This left a big gash in the ceiling, but not to worry... the plaster guys come on Monday.


Monday, November 15, 2010

Home Renovation: Lap 2

When Betsy and I bought the house, pretty much the first thing we did was caulk the bathtub. The reason we made this such a priority was that water was dripping from the dining room ceiling about 20 minutes after either one of us took a shower. It didn't take much detective work to figure out that the near total absence of caulk around the tub was allowing a good deal of water to shoot straight down into the room below. Four years later, the caulk was starting to look a little worse for wear, and with all the effort about to be put into fixing up the dining room, we didn't want a repeat of the waterfall. So, in addition to the wallpaper scraping this past weekend, Betsy took it upon herself to clean out the old, mildewy caulk and expertly apply a new, fresh layer.


I guess this means I'll be re-staining the back fence pretty soon.


Sunday, November 14, 2010

Dining Room Demolition


After prepping for wallpaper removal last night, we were ready to go this morning (late morning) with the steamers. These things suck up a lot of electricity. We had them plugged into the same circuit, and blew a fuse within 10 minutes. The extension cord was almost too hot to touch - yikes! After separating the steamers onto their own circuits, it was... uh, well I guess it was full steam ahead. One wall down, three to go.

Listened to:

  • Superchunk - Majesty Shredding
  • Bruce Springsteen - Born to Run
  • Harry Nilsson - Nilsson Sings Newman


Saturday, November 13, 2010

...And, We're Back


Spent today gearing up for stripping wallpaper in the dining room. Should be fun.

EMH-101113_002a

Saturday, October 24, 2009

Windows on Wolf Street

Part one of our front-of-house restoration took place last year, with the installation of a new door and the renovation of the frame surrounding it. Now we move on to part two, which involves new windows for the front of the house, along with the restoration of the original wooden window frames and the tin cornice along the top of the house.

Rob is back on board for this project (he installed the front door), and the other day he removed all the aluminum flashing to reveal the original, ornate wooden trim that has been covered up since at least sometime in the 1970s, when the current replacement windows were installed.


As you can see, they're still intact for the most part. Rob added a coat of primer to protect them until the parts that need fortifying or rebuilding can be taken care of - that should be happening over the next week or so. Rob's trying to get as much cosmetic stuff done ahead of time so that when the windows arrive, he'll be able to pop them right in.

Friday, August 28, 2009

Rain Barrel

Update
We had a pretty big rain storm yesterday afternoon, and all I can say is, wow, that barrel fills up fast! I guess 54 gallons isn't that much when you're talking about the amount of rain that lands on your roof - it took about 20 minutes. Everything worked as it should, although the barrel reached its full capacity just as the downpour was at its heaviest, and the overflow hose couldn't handle the deluge. Water poured over the top of the barrel onto the ground, although this wasn't too big of a problem since the concrete below slopes directly to another storm drain 6 feet away. Once the rain leveled off to a moderate level, though, the overflow hose was able to handle the excess water with no difficulty. Here's a quick video of the rain barrel in action during moderate rainfall:


Today we tested out the soaker hose to slowly drain the barrel while watering the garden, which worked like a charm. The weather forecast calls for some more thunderstorms today, followed by a whole week of sunny skies, so it'll be nice to have the rain barrel to carry us through the dry period.


Philadelphia has a big problem with storm-water runoff, particularly in South Philly. There are so few trees, parks, and otherwise permeable surfaces down here that when it rains, just about all of that water goes into the sewer system. Parts of our sewer system are OLD. Like, 100 years old. It cannot handle it. I won't go into all the details of how our sewer system works (check out this link for more information), but let's just say that when we have a big rain, water that should be going to the sewage treatment plant ends up spilling over into the local rivers and/or backing up into our basements - it's a real problem.

The Philadelphia Water Department (PWD) is trying to do something about that. Rather than digging up all the small-diameter pipes that carry storm water under our streets and replacing them with large-diameter pipes, they're taking a less invasive, more environmentally friendly approach that includes experimenting with permeable concrete, curb bump-outs that allow long stretches of flowers and trees to be planted, and mass giveaways of rain barrels. Yep, they're giving them away through workshops that they're having all over the city. The rain barrels collect water that's running off your roof and headed toward the sewers. So far, PWD estimates they've given out over 1,500 rain barrels, keeping over 5 million gallons of water out of our sewers during peak storm times. The water collected in the barrel can be used to water your plants or wash off patio furniture. If you don't use the water, you can at least release it gradually after the storm, when the sewer system is not as stressed.

We got our rain barrel last week, and decided the best place for it would be at the back of the little alley that's formed between our house and the patio wall. However, this meant I would need to reroute the downspout from the front of the alley to the back where the barrel is. Easier said than done.

Our downspout was made up of two 10-foot long aluminum tubes that ran straight down from the roof to the storm drain on the ground. My plan was to remove the lower tube, insert an elbow joint angled toward the back of the alley, and then insert the second tube into that. At the end would be a short, flexible piece of plastic downspout that would angle right into the barrel.

After a trip to Home Depot for the supplies, I got to work. It was 7 PM - about an hour of daylight left. I began by trying to separate the lower downspout from the upper downspout. They were connected together really tightly. What they were not connected to tightly was the wall of the house, and the whole thing came crashing down. I spent the remainder of the daylight trying to separate the two downspouts without damaging them (which I eventually did) and then putting it back up temporarily until I had more time to assemble things properly. This involved Betsy standing on a ladder holding the downspout up while I stood on the patio wall and tried to hammer in a temporary holding spike while not hitting Betsy in the head. Success on all counts, just as we lost all daylight.

The next day after work, things went more smoothly. I connected the elbow to the upper piece of the downspout, and mounted it back onto the wall of the house. The lower part of the downspout ended up being to long, so I had to cut it with a hacksaw. Then I mounted one end to the elbow and the other end to the wall. Finally, I added the flexible piece of downspout and angled it toward the barrel.


Two hoses leave the barrel. One connects to a spigot at the bottom of the barrel. It's a soaker hose that gradually releases water through the material of the hose itself (it "sweats"). This runs along the patio wall and into the garden, where it rests on the ground among the plants. Whenever we want to water the garden, we just turn on the barrel spigot and let the hose sweat for a while.

The other hose is connected to an overflow valve at the top of the barrel and is thicker than a typical garden hose. During a heavy storm, when the barrel fills completely the water will leave through this hose and flow into the storm drain where the water used to go before we got the barrel.


While we were putting this all together, I was reminded of my grandpa, who built a huge concrete cistern behind his house to collect rainwater from the roof. Pipes led from the cistern back into the house, where he used the water for showering and washing dishes - he built this back in the late 70's! The rain barrel is small potatoes in comparison, but I could imagine the fun he had figuring out ways to re-route and re-purpose water.

Now all we have to do is wait for a rain storm and hope the whole thing doesn't fall off the side of the house. I'll keep you posted.

Sunday, June 07, 2009

Trouble With the Tree


Last Fall, Betsy and I planted a tree in front of our house. The tree was given to us by a nonprofit company called Treevitalize, which promotes tree planting in urban areas in and around Pennsylvania. Ours was not the only house to receive a tree; several other houses in the neighborhood had applied and also received trees, all of which were being planted on the same day.

Our tree did differ from all the others, though, in that it was a bare root tree, rather than a ball-and-burlap tree. Bare root trees are just that - when the tree is dug up from the nursery, the roots are cleaned of dirt and dipped in a special gel that keeps them moist. Then the roots are wrapped in an air-tight plastic bag until it is time to plant the tree in its new space. Ball-and-burlap trees have a root ball - basically a big ball of dirt around the roots that is then enclosed in a wire cage and wrapped in burlap. The burlap and part of the wire cage are removed when the tree is put in the ground. There are pros and cons to both methods, but it is generally thought that the bare-root method gives the tree a better chance in its new environment.

Unfortunately, that wasn't the case for our tree. Of all the trees planted that Fall afternoon, ours is the only one that doesn't seem to be surviving. During the Spring, when leaves were starting to bud, I decided to take a picture of our tree each day to track its progress (see below). It quickly became apparent, though, that our tree wasn't progressing like all the others. Although there were some leaves and flowers, most of the branches remained bare. After awhile, green, leafy shoots began coming out of the base of the trunk. At first we thought this was a good sign (at least there's some growth), but we soon found out that this meant the tree was suffering from stress. The leafy shoots are known as "suckers," because they suck the life out of the tree.


Betsy and I found this out when we attended a local tree tenders program, which we just finished up last week. We learned about planting and caring for trees, proper pruning methods, and how to encourage others to get involved with planting trees. We showed one of our instructors pictures of our tree, and he told us that things did not look good - we should cut away the suckers and water it constantly, but even then, the tree was probably going to die.

We're doing as instructed, and hoping for the best. If it doesn't work out, we've been told that eventually the tree will be replaced with a new one by Treevitalize. In the meantime, Betsy and I have been busy planting other trees around the neighborhood, trying to cut down on the vast stretches of unbroken concrete here in South Philly. Fortunately, most of them seem to be holding their own.

Saturday, September 20, 2008

Face Lift, Part II


Well, it took a little longer than he expected (eight days instead of three), but the new front door is now painted, installed, and weather-stripped. I have to say, it turned out even better than we hoped it would. For a complete set of before-and-after pictures, go here.

Next year, we'll work on getting the front windows and window frames to match the entryway. Rob is game for working on those as well, which is great.

Wednesday, September 17, 2008

Face Lift

Cosmetically, the biggest liability our house has is the front door. It literally looks like it's about to fall off. The frame is full of rot, as is the door itself, and the transom window is yellowed, opaque, and depressing. From the beginning, we realized that once the plumbing and electrical infrastructure was taken care of, this project needed to be near the top of the list.


The biggest part of this job was research. We liked the overall look of the door and the frame, and wanted to try and get them restored as close as possible to their original forms. When Betsy and I first started shopping around, we went to several door and window outlets, as well as Home Depot and Lowes. The only options there were bland, tacky metal doors with completely utilitarian frames; no customization available. These were a far cry from the ornately carved-wooden details that were a main feature of our current entryway.

The more Betsy and I looked around, the more we realized that this was not a job for our "learn-as-we-go" M.O., so we went with a professional. Rob Plunkett (no relation to the Raiders quarterback) came recommended from our friends Andy and Meg. He had redone their door frame, and although it was a modern, simple design, it looked great and was done right. We had him take a look at our door, and he was up for the challenge. He thought some of the frame was salvageable, but the rest he would re-create with new wood. The door itself would have to be replaced completely (we figured that). We decided that Betsy and I would get the materials and Rob would do the installation. This is when our real work began.

We were basically buying this new entryway à la carte: we got the door from a place in Northern Liberties, the door knob and lock from Lowes, the mail slot and door bell from a place in Portland, Oregon (everything local was too big for the door), the custom glass from a place in South Philly, and the paint from yet another place in South Philly. Rob handled the lumber for rebuilding the door frame.

It took several months to get everything together, but finally our work is done and Rob's is beginning.


Stay tuned to see how it turns out!

Saturday, August 09, 2008

New Couch!


Unless you don't mind waiting almost 4 months for delivery, you probably don't want to order a couch (or anything else) from this place. That said, it's a lot more comfortable than the old one, which came with the house.

Thursday, July 31, 2008

Garden Variety

Mid summer here on Wolf Street, and thoughts naturally turn to the outdoors. In our case, outdoors is an 8x12 patch of concrete with a grill, a table, and some chairs. Our regular readers may recall that last summer we put up a fence along one side of the patio - I'm sure you'll be happy to learn it hasn't fallen down yet. This summer, we've decided to plant a garden. But instead of buying (or building) planter boxes to put on top of the concrete, we've opted to dig up portions of the concrete and plant directly into the ground. This idea stemmed from a conversation Betsy and I had with my aunt Kathleen at my brother's wedding last year. She was telling us about how amazing her garden was, and that she was sure it was because she had the concrete removed and planted directly into the ground. I remember this vaguely, but Betsy remembers it vividly. From that moment on, we were definitely digging up the patio.

When spring came, we talked about how we might go about digging up the concrete: rent a jackhammer? Hire a contractor? We kept visiting the subject, but could never come to a decision. Finally, as April turned to May, and our resolve was starting to weaken, we decided to give our friend Kevin a call. Kevin is a general contractor, and we figured he'd at least be able to give us some advice. He suggested a combination of a crazy-sharp saw to score the cement and a sledgehammer to break it up. Unfortunately, his crew had just quit so it was to be just me and him. (On the up side, it was cheaper to hire just one guy instead of three.)

After several scheduling delays, we got to it on a drizzly weekday morning. First, Kevin scored the outline of the garden with the saw while I sprayed the blade with water from the garden hose so the blade wouldn't overheat. A metal blade cutting into concrete with cement walls all around is pretty much louder than the loudest thing you can think of. Louder than standing next to an ambulance siren. Louder than a very low-flying helicopter. Louder than Dinosaur Jr and My Bloody Valentine at City Gardens in 1992 (and a lot less pleasant). After a minute, I called time and went to get my ear plugs. I couldn't find any for Kevin, but apparently he's used to this, which had me wondering how he had any hearing left at all.

Once the concrete was scored, the fun began - hitting the concrete with a sledge hammer. That fun lasted about 5 minutes until the fatigue set in. And we still had about 90 minutes of sledge-hammering to go. We switched off every 10 minutes or so, with the person not on hammer duty at the moment sweeping up the shards of concrete into a bucket and then dumping them into contractor trash bags. Kevin knew of a place that would take broken up concrete for $25 a ton, or something like that. Fortunately, we had less than a ton, but it didn't seem like much less than that.

Finally, after hammering, picking, and digging for almost 2 hours, we ended up with this:


As I was leaving for work later that day, our next door neighbor, Ann, came out and said she used to have an in-ground garden in her back yard, but the basement kept flooding so they had to have it cemented over. I said, "Nice timing, Ann."

I didn't really say that.

Anyway, after removing all the sandy dirt and small rocks that were in the holes, followed by the careful arranging of way too many pieces of slate around the perimeter, followed by 30 forty-pound bags of top soil, we began to plant. The left side was for flowers, and the right side was for vegetables and herbs. To start with, we stayed mostly with herbs, but we did put three tomato plants in. The end result is this:


Not bad, eh? These pictures are from about a month ago, so there have been some developments since then. We'll save that for another post, though.

Saturday, April 12, 2008

If you've seen one Dr. Phil, you've seen 'em all...


So, healing is boring, it turns out. Healing Waters was our color of choice for the accent wall in the bedroom. But it looked like we had made a nursery and were about to move in a big stuffed bear and apply a ducky border. Pickle is too old for a nursery. So it was back to the drawing board. I thought of layering Healing Waters over Underseas (theme: water!), but Ed thought of mixing our own concoction of the two in an old cookie jar. More color control. And now we give you our own blue. It's not too green and it's not too baby. And we've named it Pepto Blue. Pepto Blue -- kind of retro, kind of kind and good for what ails ye.


(And kind of looks like the Cira Center in a storm.)

Monday, March 31, 2008

Choosing Color - Together!

It's been Ghostship for almost a year and a half now. Icelandic-ly delicious, no? Until push came to shove and the paint was about to be up there on the bedroom walls, all around us, while we slept. Like a blanket of ghost. I got cold feet. Iceland cold. Maybe I heard one too many ghost stories as a child.

Or, maybe I've been watching too much HGTV - but I started thinking about the transposition of warmth and the shade that passes between two hues and architecting atmosphere. And, well, Ghostship is cold, right? So, I went all 
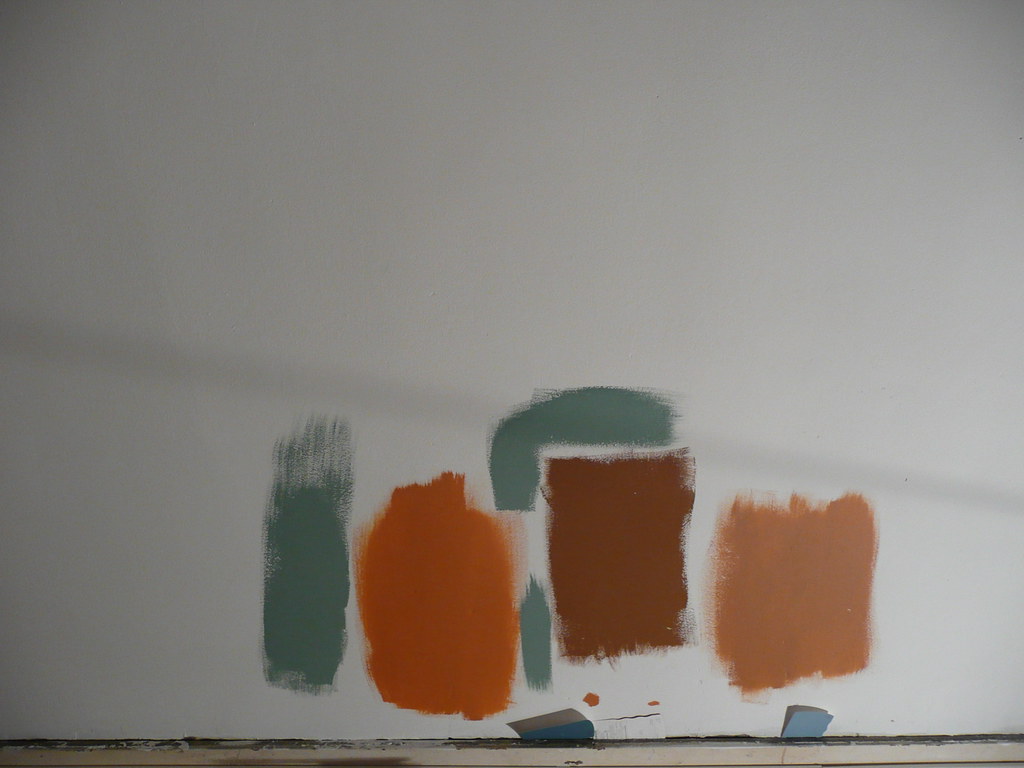
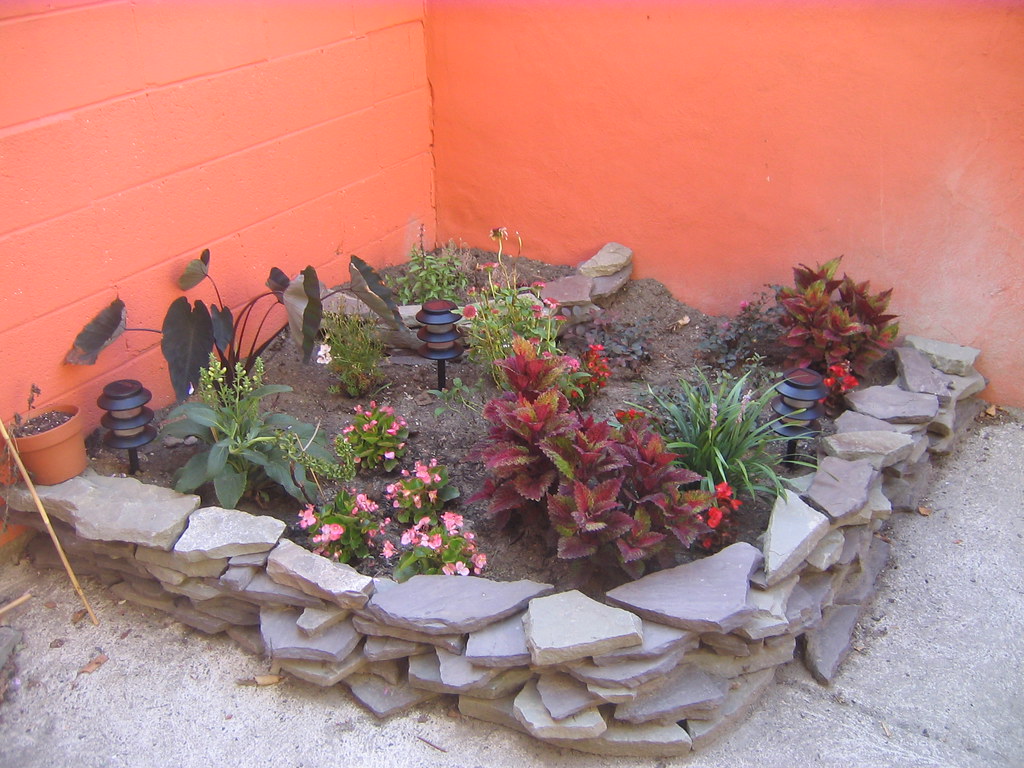
Bobby Brown on Mr. Hogarty and decided a warm orange, like a mix of mangoes and sun, was in our sleep future. And Mr. Hogarty indulged me - until we put our sleep future up on the wall and it didn't look right either [see 2nd and 4th colors from right in picture]. When it comes to orange, what is good for the back patio - orange! - is not good for the bedroom (as they say) and though the shades were called something like Sienna's Miller and Hut's Desire, they are actually more like orange-y brown and brown-y orange. We thought we learned our lesson there, but then we went back for Tanbark, which is (see brownest shade in picture) pretty damn dark/bark as well.

Why is warm in theory, dark on walls? Oh, paint/color theorist - read our blog, leave a comment and answer my inquiry.


Ed and I wanted no VOC paint and found an affordable line at Sherwin Williams about 8 blocks away. We used their website a lot, especially the handy "Color Visualizer' -- a tool that allows you to paint and re-paint (and re-paint and re-paint and take a break, watch a movie and paint and re-paint) the walls of a generic room choosing from any of the 700 colors with names like Shipshape and Ship's Mate and Procreate and Head of State, to name a few. But not only could we not find a generic bedroom on Color Visualizer that looked like ours, the virtual paint never looked the same when we got it home and put it up. Choosing a color ALONE is a hard task; choosing a color together is like trying to buy one pair of jeans that you can both wear -- ridiculous. One person has to persuade and the other person just has to go with it. Or, get sick of it and walk away. And come back an hour later and say, "Are you still using the Color Visualizer?" No, no, I'm really not.

But, the tall tale spins positively because, if we had just stuck with the icy boat, we would have never come up with Moroccan Brown and Underseas. See? [Pic soon]. We get our warmth and a little chilliness mixed together. Imagine a submarine off of Tunisia. Or a frigate at the Cape of Good Hope. That will be our bedroom. Warm. and cold. And Warm. and cold. And WARM...

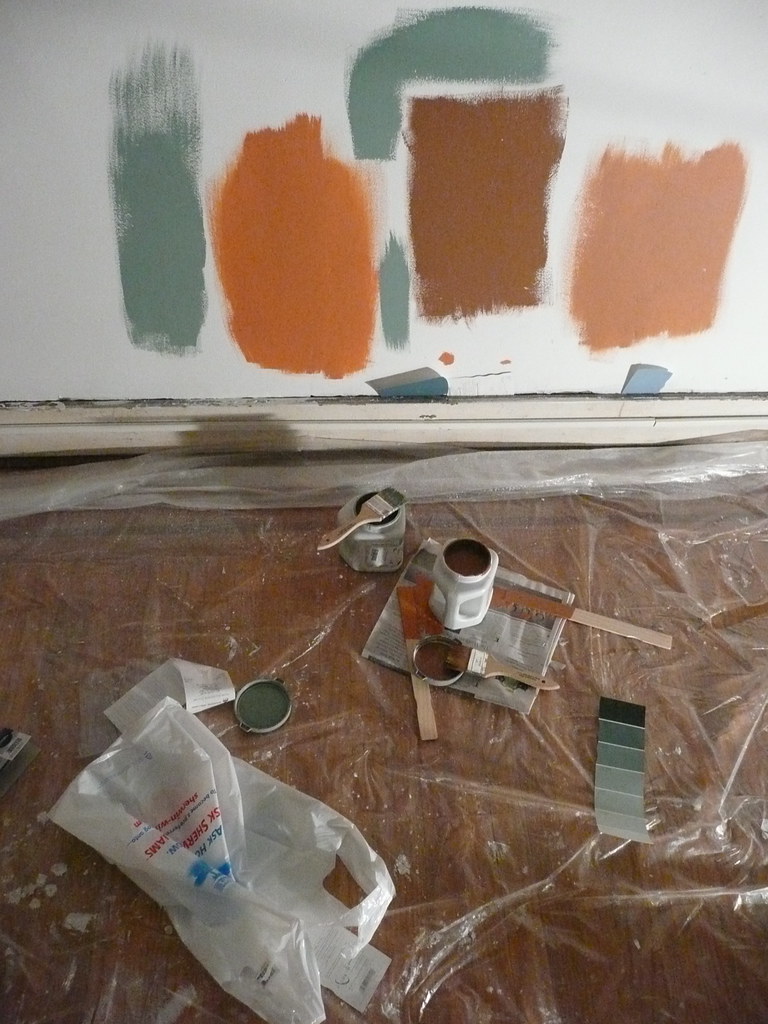
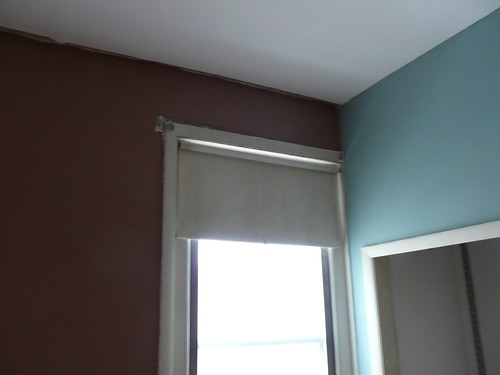
And for now we have our own Cy Twombly-like wall [see photo above]. Coincidental and odd because underneath the primer on this same wall, which was also once under 4 layers of wallpaper [see post titled "I fought the Wall and the Wall Won"], there is a heart drawn in pencil and inside the heart, some chicken scratch that says, (to the best of my knowledge): "When I grow up, I want to be a undecipherable." And each word has a pencil line drawn through it. Very Cy.


Or maybe our attempts at Cy Twombley imitation should have gone on the other wall where - under 4 layers of wall paper again - we discovered a picture of a woman with no head; just a skirt covering a pretty big butt and some shapely legs. That one is a lot more Picasso...or no, that other guy...DeKooning.


Post post: No color theorist wrote in, so we did not know that Underseas would be too green to mix in well with the red, warm mud walls of Morocco. More research revealed that Home Despot also has no VOC paint called "Freshaire", and since the Deep is open on Sundays we were forced to buy paint that features in depth interviews of political leaders and topical and cultural icons and TG fawning over anyone remotely related to The Wire. The color that we picked for the accent wall is called, "Omar Coming". Not really, it's called: 'Healing Waters'.

The guy at the Deep told me that since their business is mostly contractors, I was only the second customer to buy no VOC paint in the whole two months that they've had it. The price is almost twice as much as what we paid at Sherwin Williams, so....go to Sherwin Williams. Or Greenable in Old City, though I've heard that that one is pricey too.

But I can't think about the cost now. Let the Healing Waters flow...

Saturday, March 01, 2008

Our Bedroom is Like The Grapes of Wrath


Redoing the master bedroom is a project that has now taken at least 6 months longer than we thought it would. We've stripped several layers of wallpaper off the walls, repaired the plaster underneath, installed supports for a ceiling fan, demolished the current closet and rebuilt the shell for a new one, and put a new ceiling up.

Through all of this, the part that has been the biggest pain in the ass is the sanding. Betsy has written before about the dust that permeates our lives, and sanding those walls did take forever. However, that task cannot compare to sanding the ceiling.

When you sand a wall, you are next to it. The plaster/joint compound dust falls between you and the wall. When you sand a ceiling, you are on a ladder, directly beneath it. The dust falls into your eyes, ears, and nose.

Now, I'm not an idiot - I'm taking precautions by wearing a mask and safety glasses. I'm also wearing a hat. But there are some complications. First of all, I can't wear my contact lenses while sanding. The fine dust that's in the air immediately starts irritating them, and they get dried out. So I need to wear my glasses. On top of my regular glasses, I wear the safety glasses. As I breath in and out, the air I exhale gets pushed out the top of my mask and fogs my regular glasses. To combat this, I push my glasses far out to the tip of my nose. This pretty much eliminates any peripheral vision. The safety glasses get covered with dust almost immediately, so every few minutes, I need to stop and, using my index finger, wipe the safety glasses clear. But they never really get clear.

My friend Andy suggested putting a sanding block on a long pole, and sanding from the comfort of the floor, but I just don't see how you could get any leverage that way. It would be nice to not have to climb down the ladder and move it a foot this way or a foot that way every 5 minutes.

Anyway, the ceiling is almost finished. After that, the room gets a serious cleaning and the fun part begins - painting!

Tuesday, January 22, 2008

Momentum Killer

If you've finally managed to work up some enthusiasm for a day-long spackling session, and then this is what you see when you open the door, it's a real bummer.


Nothing kills the momentum like an open bucket of rock-hard joint compound.

Sunday, January 20, 2008

False Starts


There was a lull, sure. I'll cop to it. Because you're not always working toward being in your house. Sometimes it just sits there, like base camp, for you to drop your stuff off or eat a meal. Sometimes there's too many things happening away from the house. Outside. The rest of life. Weddings, funerals, shows, parties and the great Southwest, for example. What do we care what shape the house is in...we're never in it? That was this summer for us; we were out. But now we're back.

Aside from having a lovely summer and being places I'd never been before - Vegas, Santa Fe and Taos -- we gained a new member of the Hogs and Herbs family. A 17-pound lionine mister who even has fur on the INSIDE of his mouth and a face that looks like a cigar blew up in it. When we talk in his made-up voice, it comes out sounding like Edward G. Robinson, and he becomes a small, but street-wise gangster character named Pickles Mcgee, see?

He doesn't do much toward fixing up the house. He can't weild a hammer or climb a ladder. He can't sand or plaster. And if you count pooping in the house as not really helping but hurting, then well, he's still occasionally hurting. But he is good at sniffing. He can find a baked good on the street that's been buried under leaves for 2 days (more common than you'd think in South Philly). And he also does a mean Dick Cheney imitation. Really, ask him some time.

But despite the travel and Pickles nonchalant attitude toward home improvement, we did do some stuff. We pulled up rugs. We lucked out; the floors are hard wood, warm tones with an oak inlay. They are in good shape. We improved the bathroom, with new lighting fixtures and a big white mirror. We bought some art for the walls at a Space 1026 auction. Oh, and we picked up a tree for the front of the house that looks to be a ficus. It begs the same question as our new dog: Why would anyone throw this out?

Addendum: It turns out, WE would throw it out -- the tree (not the dog). It seems to have just come into our house to shed every single leaf it had and then die. How did the previous owners know it was about to become a large potted stick? And did they walk by our house on trash day and laugh.....and laugh....and laugh?

Sunday, January 13, 2008

State of the Art


Betsy and I had a party this past New Year's Day, so we had to get the house into some sort of shape to have people over. Not that we haven't had people over before, but this was the first time a lot of people were coming over, and it was the first time most of them had seen the house. So in addition to cleaning the the hell out of the place (at least to our standards), we realized we really needed to hang some art on our totally bare walls.

This had been on our minds for a while, so we were somewhat prepared. A few months ago, we went to an auction at Space 1026 (a Philly art collective) and were able to pick up some pretty cool pieces for a pretty reasonable sum. For Christmas, Betsy's present from me included several framed and matted photos from our vacation in New Mexico this past summer, along with a really cool "See America" print featuring Carlsbad Caverns, which is a reproduction of an advertisement from the Works Progress Administration. We also had a couple of very nice watercolors painted by Betsy's dad, along with some paintings I inherited from my grandfather. Pretty much all of these went up the day before the party, and it really made a difference. Even though the same crappy wallpaper is up all over the place, the house really feels more like it's our own.

But we're still looking forward to seeing what it looks like without the crappy wallpaper.